Uploading photos to Flickr using iTunes File Sharing
Last updated March 8, 2012
Uploading photos with iTunes File Sharing
With iTunes 9.1 or later you can copy arbitrary files from your Mac/PC to your iPad, to make them accessible to applications that support File Sharing. In this way you can copy any JPGs into PhotoExplorer from you computer. You can find more information on iTunes file sharing in the following kb from Apple: iOS: About File Sharing
To upload photos using iTunes File Sharing there are two main steps:
- Use iTunes File Sharing to copy files from your computer to PhotoExplorer.
- Use PhotoExplorer to upload your photos from iTunes File Sharing to Flickr.
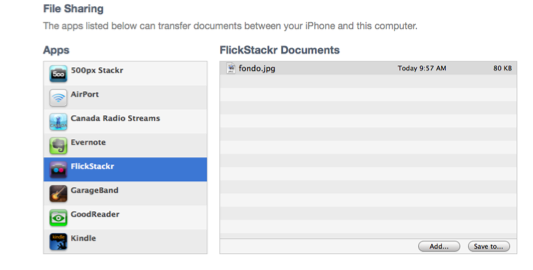
Using iTunes File Sharing to copy files form your computer to PhotoExplorer
- Connect your iOS device to your computer.
- Launch iTunes on your computer
- In iTunes select your iOS device from the Devices section.
- Click on the App tap, and at the bottom of the screen you will see the File Sharing section.
- In the File Sharing section you will see PhotoExplorer in the list of apps currently installed on your iOS device that support File Sharing.
- Select PhotoExplorer form the list and drag and drop the jpg files that you want to upload
- Now you are ready to go to PhotoExplorer on your iOS device to upload the files.
Uploading using PhotoExplorer: Selecting photos to upload
- Launch PhotoExplorer and tap on Home.
- From the menu tap on Upload. The upload list will appear, if you have not selected any photos to upload the list will be empty.
- To add photos to the upload list, from the toolbar at the top tap on +. This will show a popup where you can select the source of your photos. Select iTunes File Sharing.
- You will see all the files that you added to iTunes File Sharing. You can select photos by tapping on them. You can select many at a time. If you want to select them all tap on Toggle Selection.
- When you have finished selecting the photos you want to upload, tap on Add Selected
- All the photos selected will be added to the Upload list, you will see a small thumbnail of the photo, a message indicating if the photo has EXIF information or not, and the size of the photo (by default will be the largest available). You can find more information regarding EXIF when uploading here: What happens with EXIF information when uploading photos?
- Now that you have photos in the Upload List you can proceed to upload them or you can edit them before uploading.
Uploading using PhotoExplorer: Editing photos before upload
Editing photos before upload
Before uploading your photos to Flickr, you can modify the photo metadata (i.e. title, caption, tags, sets, groups, etc) or edit the photo with rotation, crops or effects using the Advanced Photo Editor. More information on editing photos can be found in the following two articles:
Uploading using PhotoExplorer: Uploading
You can Upload all the photos in the Upload list by tapping on Upload All, or you can select some of the photos in the Upload list:
- From the top toolbar, tap on Edit.
- Tap on the photos you want to upload. The ones selected will have a check mark.
- Tap on the Upload button.
- Upload starts, only the photos with check marks will be uploaded on a given batch. You can continue to use PhotoExplorer for other activities.